Consent Management
One of the core functionalities of a Wallet is granting a user the ability to federate permissions to access their data. The user can create, read, and disable permissions through the Wallet Server API.
Overview
The flow starts with a Service Provider requesting consent. The user then manages existing or new permissions to fulfill requirements during the transaction.
- A consent request is initiated by a Service Provider
- A consent request is a Service Provider asking permission from the resource owner to access a specific resource.
- Wallet Client receives request details
- Wallet Client receives the incoming consent request details (i.e., who is the requesting party and what are they asking for)
- Wallet Client fulfills request requirements
- The integrated UX page shows a consent page with the request details where a user can either consent or decline the request. The user can either create new permissions or use existing permissions. Clients using custom UX will have to figure out which permissions fulfill a request on their own based on the asks.
- The Wallet redirects user-agent back to the Authorization Server
- If the required permissions are given, the Wallet redirects user-agent back to the Authorization Server to provide an access token.
Transactions Sequence Diagram
The following two sections, Managing Transactions and Managing Transactions - Device Flow both reference this sequence diagram.
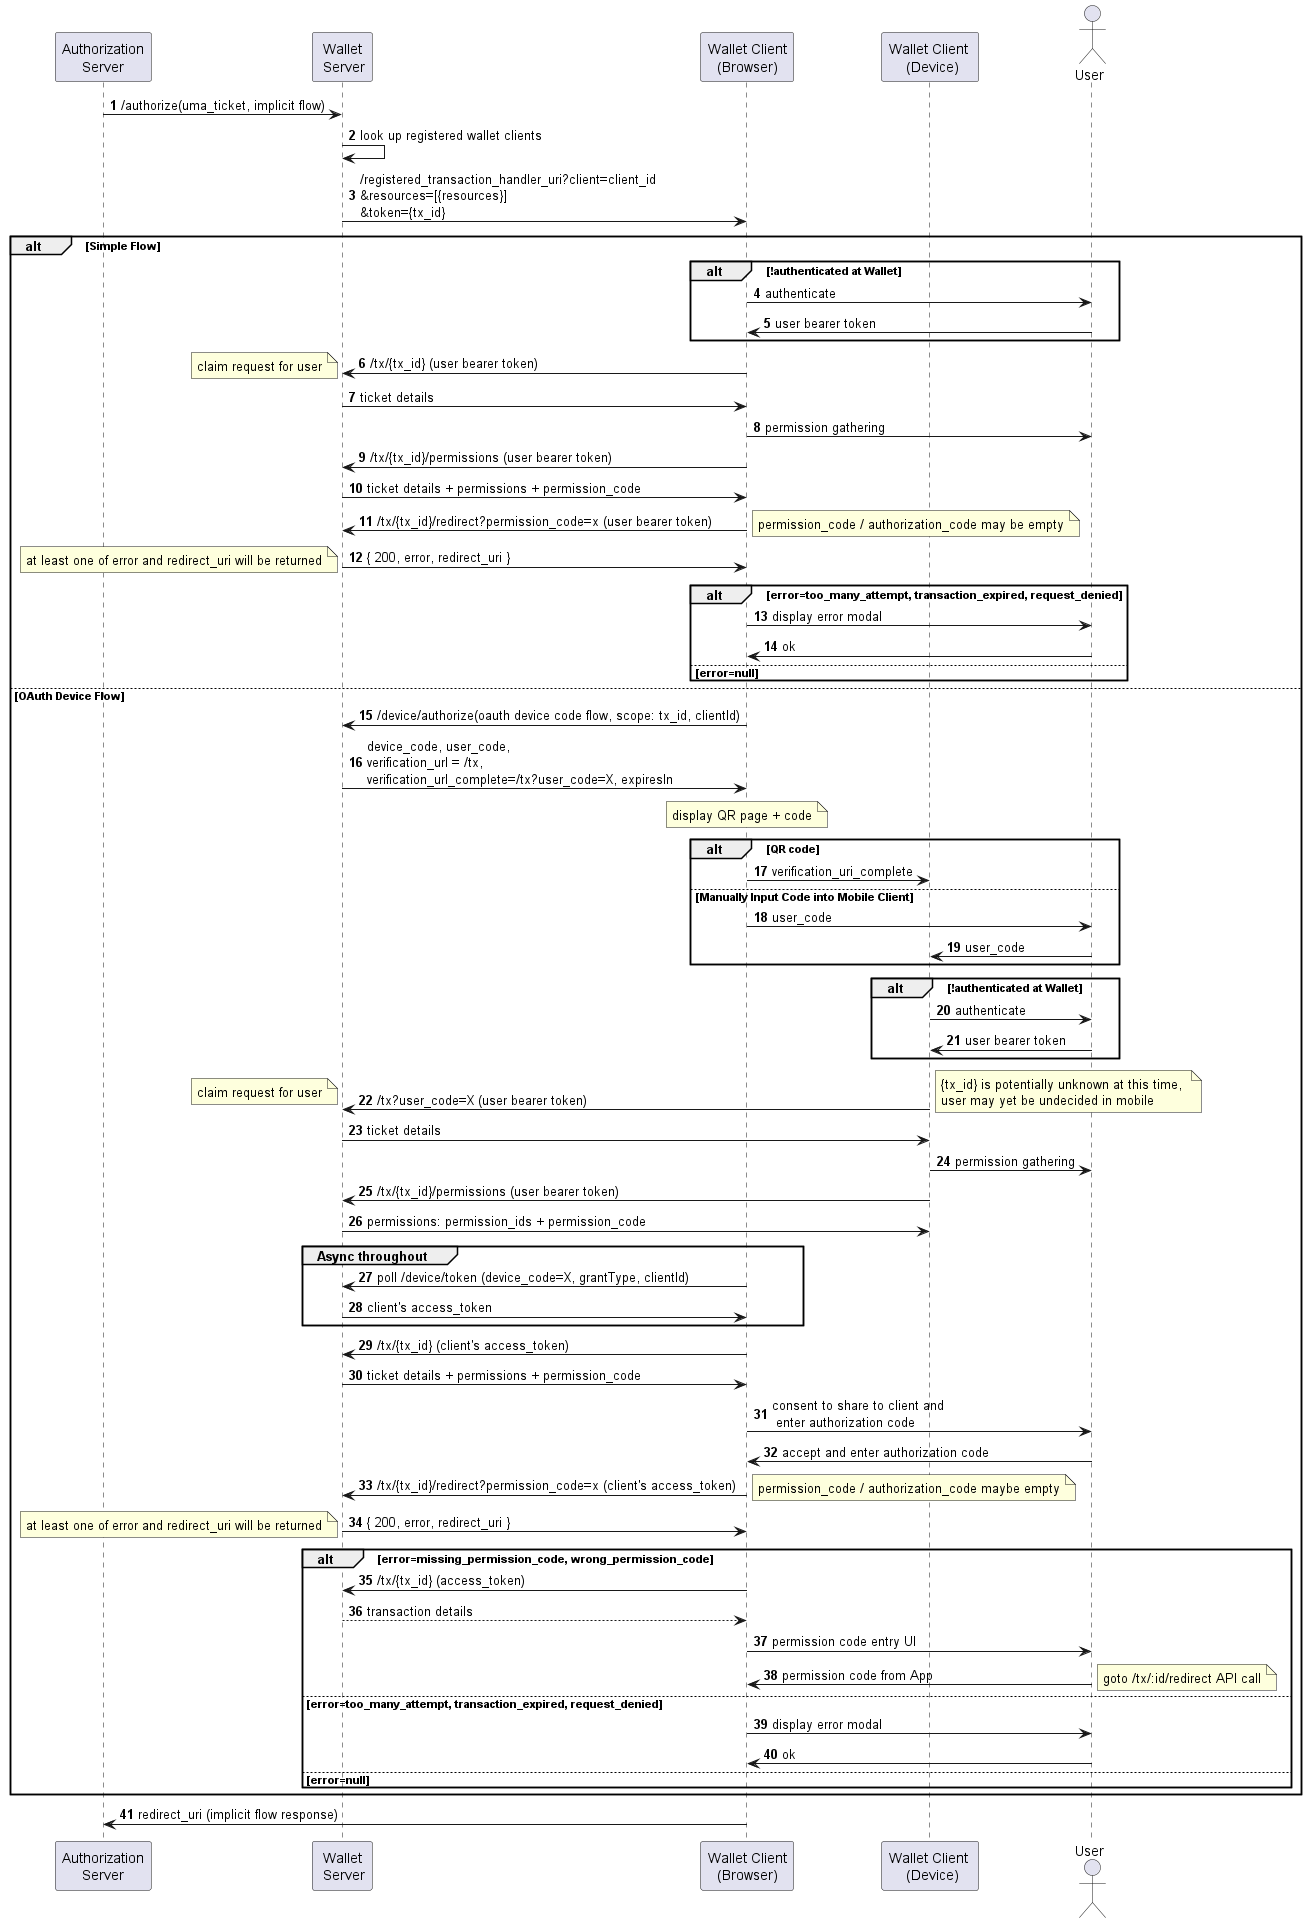
Managing Transactions - Simple Flow
This section describes the configuration, requests, and responses involved in a Consent transaction at the Wallet.
A Consent flow begins with a Service Provider request to the Authorization Server. In turn, the Authorization Server will initiate an OIDC implicit flow with the Wallet Server.
Receive Request Details
Step 3 of the sequence diagram
After the Wallet Server receives the OIDC Authorization request, the Wallet Server will return HTML to the user agent that will cause the user agent to send a GET request to a configured endpoint at the client. This call will be made to a path configured by the navigator.redirects.consentPath property of the Wallet Server application configuration.
The Wallet Client must therefore ensure that it exposes this path in order to receive the request.
Sample Request
curl -X GET '{{WALLET_CLIENT_URI}}/as-authorize?scope=openid+b5543174-58e7-44cc-83cd-8d3310e65bd8&response_type=id_token&redirect_uri={{AS_BASE_URL}}/oauth-callback&state=ZMLAEYvQcqLimD_OMls6wfaIk783ocuCToQbU105ex4&code_challenge_method=S256&prompt=consent&nonce=AJ8BuSDzjcEvG4jNKHFGfFn-RUWPHoFvFRo5_LIsSWs&client_id=as_to_ws_client_id&code_challenge=oaU7wG2dUk_XSxModUtEvoor1-uWIlRn8lo3P_JHaZc&client=fpxsp_to_as_uma_client_id&resources=https://www.identos.com/resource-definitions/identity-profile-res-def&token=5693020e-6efa-4f04-8c4b-e6cdfc52fdeb'
In the above sample, the value of navigator.redirects.consentPath is as-authorize. The Wallet Server includes a number of query parameters with this request. The most important for the Wallet Client are the values of token and client_id. The value of token will be referred to as tx_id from this point on. The Wallet Client must use these values in some of the following requests.
At this point, the Wallet Client has the option to initiate an OAuth Device flow to allow the user to complete the Consent transaction on a different device. For information on how to use the OAuth Device flow as a Wallet Client, proceed directly to the Managing Transactions - Device Flow section.
Get Transaction Details
Step 6 of the sequence diagram
This is an authenticated request and requires a Wallet Session token to be supplied. The Wallet Client will therefore need to check whether it holds a valid token for the given user, and if not it must initiate a login flow with the Wallet Server prior to completing this next step. The process of authenticating at the Wallet Server and acquiring a Wallet Session token is described in more detail here.
Any requests in the following steps that show the inclusion of an Authorization header with the value of Bearer {{WALLET_SESSION_TOKEN}} must use the Wallet Session token acquired.
The following request will provide the client with transaction details, including information about the Service Provider who initiated the Consent request with the Authorization Server, which resources were requested, and any permissions that may already have been granted by the user (see the sample response below).
Note that if no permissions have yet been granted, the permissions field of the response will be empty.
Sample Request
curl -X GET \
  '{{WS_BASE_URI}}/tx/{tx_id}' \
  --header 'Accept: application/json' \
  --header 'Authorization: Bearer {{WALLET_SESSION_TOKEN}}'
Sample Response
{
  "client": {
    "identifier": "string",
    "name": "string",
    "authorization_server": {
      "identifier": "string",
      "organization": {
        "id": "string",
        "name": "string"
      }
    },
    "icon_uri": "string",
    "policy_uri": "string",
    "tos_uri": "string"
  },
  "transaction_id": "string",
  "requested_resources": [
    {
      "rs_req_id": 0,
      "resource_definition": {
        "res_def_id": "string",
        "name": "string",
        "authorization_server_id": "string",
        "type": {
          "name": "string"
        },
        "description": "string",
        "information_uri": "string",
        "scopes": [
          "string"
        ],
        "named_scopes": [
          {
            "scope": "string",
            "display_name": "string"
          }
        ]
      },
      "scopes_requested": [
        {
          "scope": "string",
          "display_name": "string",
          "purpose": "string"
        }
      ]
    }
  ],
  "permissions": [
    "permission_id": "string",
    "data_source": {
      "data_source_id": "string",
      "style": {
        "style_color": "string",
        "style_font_color": "string",
        "logo_url": "string"
      },
      "name": "string",
      "organization": {
        "id": "string",
        "name": "string"
      }
    },
    "authorization_server": {
      "identifier": "string",
      "organization": {
        "id": "string",
        "name": "string"
      }
    },
    "resource": {
      "res_def_id": "string",
      "name": "string",
      "authorization_server_id": "string",
      "type": {
        "name": "string"
      },
      "description": "string",
      "information_uri": "string",
      "scopes": [
        "string"
      ],
      "named_scopes": [
        {
          "scope": "string",
          "display_name": "string"
        }
      ]
    },
    "rs_res_id": "string",
    "created": 0,
    "expires": 0,
    "disabled": 0,
    "used_by_transaction": [
      "string"
    ],
    "ds_account_id": "string",
    "scopes_granted": [
      "string"
    ],
    "named_scopes_granted": [
      {
        "scope": "string",
        "display_name": "string"
      }
    ]
  ]
}
Push Permissions into Transaction
Step 9 of the sequence diagram
After receiving the transaction details, the Wallet Client should now prompt the user for their consent to the request made by the Service Provider, including the specific permissions being requested and the scopes requested for each.
Once the user has given their consent, the Wallet Client must make a request to the Wallet Server's /tx/{tx_id}/permissions endpoint to create new permissions at the Wallet Server. Each permission that the user has approved should be included in the request body as separate entries in the top level array, along with the requested scopes that were approved.
Note that if any permissions were already present in the response received in the previous step, each of these permissions and their granted scopes must also be included in the following request. The permission ID should be included for each pre-existing permission (new permissions do not yet have a permission ID).
The sample request below shows how the request body would look with one new permission and one pre-existing permission.
The response to the request shown below will include a permission_code, which will be used in the next step.
Sample Request
curl -X POST \
  '{{WS_BASE_URI}}/tx/{tx_id}/permissions' \
  --header 'Accept: application/json' \
  --header 'Authorization: Bearer {{WALLET_SESSION_TOKEN}}'
  --data-raw '[
  {
    "dsa_id": "string",
    "rs_res_id": "string",
    "scopes_granted": [
      "string"
    ]
  },
  {
    "permission_id": "string",
    "dsa_id": "string",
    "rs_res_id": "string",
    "scopes_granted": [
      "string"
    ]
  }
]'
Sample Response
{
  "permissions": [
    {
      "id": "string",
      "created": "2022-12-08T18:49:28.974Z"
    }
  ],
  "permission_code": "string"
}
Redirect to Authorization Server
Step 11 of the sequence diagram
The Wallet Client must now make a request to the Wallet Server's /tx/{tx_id}/redirect endpoint to get a redirect URL that can be used to complete the initial OIDC implicit flow that was started by the Authorization Server.
This request will either return the redirect URL or an error if anything has gone wrong.
Note that the value of permission_code received in the previous step must be included as a query parameter on this request.
Sample Request
curl -X GET \
  '{{WS_BASE_URI}}/tx/{tx_id}/redirect?permission_code={permission_code}' \
  --header 'Accept: application/json' \
  --header 'Authorization: Bearer {{WALLET_SESSION_TOKEN}}'
Sample Response
{
  "redirect_url": "string",
  "error": "string"
}
After the response is received, the Wallet Client must make a GET request to the redirect URL to finish the Consent transaction.
Error on Redirect
Step 13 of the sequence diagram
For handling errors returned by Wallet Server after a failed request to /tx/{tx_id}/redirect, the Wallet Client (browser) should present the error to the user with instructions on what to do.
In some cases the error is unrecoverable and no further user interaction is warranted. Examples of this include when too many failed attempts have been made, when the transaction has expired, or when the authorization request was denied. In these cases, the transaction cannot continue and the Wallet Client (browser) should make a call to terminate the transaction once the user has finished viewing the error. See the Cancel After Permissions Were Pushed step below for how to terminate the transaction in this way.
Managing Transactions - Device Flow
The Wallet Client has the option to initiate an OAuth Device flow to allow the user to complete the Consent transaction on a different device. This is often used for devices that do not have web browsers, although this is not a requirement. The following steps give details on the requests and responses involved.
Note that even if the OAuth Device flow is being used, the Wallet Client must still receive request details, as described above, before proceeding.
Given that the OAuth Device flow is concerned with authorization between a browser and another device, the references to "Wallet Client" in the following steps will be further qualified by saying whether the request should be made by the initial browser-based client or the device-based client. Note that the device-based client could also be running in a browser, but will still be referred to as "device-based" or "Wallet Client (device)".
Initiate OAuth Device Flow
Step 15 of the sequence diagram
The Wallet Client (browser) may initiate an OAuth Device flow with the Wallet Server by making a POST request to its /device/authorize endpoint. The values of token and client_id received in the previous step must be supplied in the body of this request. The value of token will be referred to as tx_id from this point on. It identifies the transaction at the Wallet Server. This value should be provided in the "scope" field of the request body, concatenated with the base URI of the Wallet Server and the /tx endpoint, as shown:
Sample Request
curl -X POST '{{WS_BASE_URI}}/device/authorize' \
--data-raw '{
  "scope": "{{WS_BASE_URI}}/tx/{tx_id}",
  "client_id": "{client_id}"
}'
Sample Response
{
   "device_code":"34d92518-d991-4562-8976-984a2cd44657",
   "user_code":"434258",
   "verification_uri":"com.identos.demo.wallet://fpx-wallet/consent_request",
   "verification_uri_complete":"com.identos.demo.wallet://fpx-wallet/consent_request?user_code=434258",
   "expires_in":"2023-05-01T19:43:19.858Z",
   "interval":5
}
The values for user_code, device_code, and verification_uri_complete may be used in the following requests.
Transfer User Code to Device
Step 17 and 18 of the sequence diagram
The purpose of the OAuth Device flow is to enable the continuation of an authorization flow between a browser and another device. Therefore it is important to validate the device that continues the authorization flow. This is a process that involves the browser-based client and the device-based client together, and the goal is to send a request from the device-based client to the Wallet Server that includes the user_code acquired above.
There are two recommended ways this can be done that will be covered here. Only one of these methods should be chosen, and the specific implementation is up to the Wallet Client.
QR Code
The Wallet Client (browser) may display a QR code that the user can scan on their device (assuming the device has a camera, such as a smart phone). This QR code should encode the value of verification_uri_complete from the previous request. On the same page, the browser-based client should display the user code.
When the user scans the QR code on their device, the device-based client can receive the information it needs this way by parsing the user_code from the value of verification_uri_complete. It should then display the user code received and ask the user to confirm that it matches the one displayed by the browser-based client before proceeding to the next step.
Manual Input
The Wallet Client (browser) may display instructions for the user to manually input the user_code into the device-based client.
Validate User Code from Device
Step 22 of the sequence diagram
This is an authenticated request and requires a Wallet Session token to be supplied. The Wallet Client will therefore need to check whether it holds a valid token for the given user, and if not it must initiate a login flow with the Wallet Server prior to completing this next step. The process of authenticating at the Wallet Server and acquiring a Wallet Session token is described in more detail here.
Any requests in the following steps that show the inclusion of an Authorization header with the value of Bearer {{WALLET_SESSION_TOKEN}} must use the Wallet Session token acquired.
Authentication with the Wallet Server must be performed from the device-based client, since the authenticated requests to follow must be sent from it.
The Wallet Client (device) now validates the user code gathered from the /device/authorize endpoint by including it in the following GET request to the Wallet Server:
Sample Request
curl --location --request GET \
  '{{WS_BASE_URI}}/tx?user_code={user_code}' \
  --header 'Authorization: Bearer {{WALLET_SESSION_TOKEN}}'
Sample Response
{
  "client": {
    "identifier": "string",
    "name": "string",
    "authorization_server": {
      "identifier": "string",
      "organization": {
        "id": "string",
        "name": "string"
      }
    },
    "icon_uri": "string",
    "policy_uri": "string",
    "tos_uri": "string"
  },
  "transaction_id": "string",
  "requested_resources": [
    {
      "rs_req_id": 0,
      "resource_definition": {
        "res_def_id": "string",
        "name": "string",
        "authorization_server_id": "string",
        "type": {
          "name": "string"
        },
        "description": "string",
        "information_uri": "string",
        "scopes": [
          "string"
        ],
        "named_scopes": [
          {
            "scope": "string",
            "display_name": "string"
          }
        ]
      },
      "scopes_requested": [
        {
          "scope": "string",
          "display_name": "string",
          "purpose": "string"
        }
      ]
    }
  ]
}
Push Permissions from Device
Step 25 of the sequence diagram
The response from the previous step is identical to that received in the Get Transaction Details step of the simple flow, except that the response comes to the device-based client. Similarly, gathering permissions from the user and pushing them to the transaction works the same way except the request should be sent from the device-based client.
Refer to the Push Permissions into Transaction step to see the form this request should take.
As an additional security measure, the Wallet Client (device) should display to the user the permission code received in the response to this request. This will be used in a following step.
Continuous Polling
Step 27 of the sequence diagram
Throughout the user's interaction with the device-based client, the browser-based client must poll the Wallet Server's /device/token endpoint. This may begin when the browser-based client transfers the user code as shown in Transfer User Code to Device, although the specific implementation is up to the client.
The requests to /device/token must include the client_id acquired in the Receive Request Details step, as well as the device_code retrieved in the Initiate OAuth Device Flow step. The request must also include a grant type of "urn:ietf:params:oauth:grant-type:device_code".
The polling should continue at intervals until the device-based client has successfully completed permissions gathering with the user as shown in the previous step. When this happens, the Wallet Server should return a response that contains an access token.
Sample Request
curl -X POST \
  '{{WS_BASE_URI}}/device/token' \
  --data-raw '{
    "device_code": "{device_code}",
    "client_id": "{client_id}",
    "grant_type": "urn:ietf:params:oauth:grant-type:device_code"
  }'
Sample Response
{
  "access_token": "string",
  "expires_in": "2021-01-01T11:00:00Z",
  "refresh_token": "string
}
Get Transaction Details
Step 29 of the sequence diagram
Once the access token is returned in the previous step, the Wallet Client (browser) must retrieve transaction details from the Wallet Server.
The token acquired from /device/token should be used as the value of {{WALLET_SESSION_TOKEN}} in this request. See Continuous Polling for more information.
This step is identical to the Get Transaction Details step in the simple flow, except the token received from the /device/token endpoint should be used instead of the user's Bearer token. See the Get Transaction Details step for a sample request and response.
Consent to Share With Client
Step 31 of the sequence diagram
The Wallet Client (browser) should now prompt the user to consent to share to the device-based client, and enter the permission code that is displayed by the device-based client as specified in Push Permissions From Device. The reason for this step is for additional security against hijacking attempts - the user must confirm that they did in fact complete the previous steps on their device, and must manually enter the permission code that was sent to their device. This prevents someone hijacking the Consent transaction by scanning the QR code from over your shoulder, for example.
If they do not consent at this stage, the Wallet Client (browser) may terminate the transaction by sending a request as shown in Cancel After Permissions Were Pushed.
Redirect to Authorization Server
Step 33 of the sequence diagram
The Wallet Client (browser) must retrieve the redirect URI that it should use to conclude the OIDC implicit flow begun between the Authorization Server and Wallet Server.
The token acquired from /device/token should be used as the value of {{WALLET_SESSION_TOKEN}} in this request. See Continuous Polling for more information.
This step is identical to the Redirect to Authorization Server step in the simple flow, except the token received from the /device/token endpoint should be used instead of the user's Bearer token. See the Redirect to Authorization Server step for a sample request and response.
Permission Code Error on Redirect
Steps 35-38 of the sequence diagram
The Wallet Server may return an error instead of a redirect URI if the permission code was not included in the previous step, or if the permission code provided by the user to the Wallet Client (browser) was not correct.
If this happens, the Wallet Client (browser) should display a permission code entry page that allows the user to retry entering the permission code. The client should then resend the previous request (Redirect to the Authorization Server).
Other Error on Redirect
Step 39 of the sequence diagram
For handling other errors returned by Wallet Server after a failed request to /tx/{tx_id}/redirect, the Wallet Client (browser) should present the error to the user with instructions on what to do.
In some cases the error is unrecoverable and no further user interaction is warranted. Examples of this include when too many failed attempts have been made, when the transaction has expired, or when the authorization request was denied. In these cases, the transaction cannot continue and the Wallet Client (browser) should make a call to terminate the transaction once the user has finished viewing the error. See the Cancel After Permissions Were Pushed step below for how to terminate the transaction in this way.
Terminate a Transaction
A transaction may be terminated in two ways.
Push Empty Permissions into Transaction
If the user completes permission gathering with the Wallet Client and either grants no permissions or declines the Service Provider's request, the Wallet Client may send a request to the Wallet Server's /permissions endpoint without any permissions included. This will close the transaction without granting permissions.
Sample Request
curl -X POST \
  '{{WS_BASE_URI}}/tx/{tx_id}/permissions' \
  --header 'Accept: application/json' \
  --header 'Authorization: Bearer {{WALLET_SESSION_TOKEN}}'
  --data-raw '[]'
Sample Response
{
  "permissions": [],
  "permission_code": null
}
Cancel After Permissions Were Pushed
If a user changes their mind or there is an error after permission gathering has completed, the Wallet Client may send a request to the Wallet Server's /tx/{tx_id}/cancel endpoint. This endpoint requires that the transaction has been completed (a request to the Wallet Server's /permissions endpoint was successfully made) or it will throw an error. Note that this is not an authenticated endpoint.
If there was an error, a string describing the error may optionally be included as a query parameter on the request.
In response, the Wallet Server will redirect the Wallet Client to the Authorization Server to close the OIDC implicit request without granting permissions.
Sample Request
curl -X GET '/tx/{tx_id}/cancel?error=an-optional-reason'
Managing Permissions
The following requests enable a user to create and manage new permissions which the user can later use in a transaction.
Create Permissions
The following request will create a new permission at the Wallet Server using only the client ID. This is one of the two ways in which new permissions can be created at the Wallet Server. The other way is described in the section on pushing permissions into a transaction, above
Sample Request
  curl -X POST \
  '{{WS_BASE_URI}}/me/permissions' \
  --header 'Accept: application/json' \
  --header 'Authorization: Bearer {{WALLET_SESSION_TOKEN}}' \
  --data-raw '{
    "dsa_id": "string",
    "rs_res_id": "string",
    "client_id": "string",
    "scopes_granted": [
      "string"
    ]
}'
Sample Response
{
  "dsa_id": "string",
  "rs_res_id": "string",
  "client_id": "string",
  "scopes_granted": [
    "string"
  ]
}
Get a Permission
The following request will get a specific permission using the permission ID
Sample Request
curl -X GET \
  '{{WS_BASE_URI}}/me/permissions/{permission_id}' \
  --header 'Accept: application/json' \
  --header 'Authorization: Bearer {{WALLET_SESSION_TOKEN}}'
Sample Response
{
  "permission_id": "string",
  "data_source": {
    "data_source_id": "string",
    "style": {
      "style_color": "string",
      "style_font_color": "string",
      "logo_url": "string"
    },
    "name": "string",
    "organization": {
      "id": "string",
      "name": "string"
    }
  },
  "authorization_server": {
    "identifier": "string",
    "organization": {
      "id": "string",
      "name": "string"
    }
  },
  "resource": {
    "res_def_id": "string",
    "name": "string",
    "authorization_server_id": "string",
    "type": "string",
    "description": "string",
    "information_uri": "string",
    "scopes": [
      "string"
    ],
    "named_scopes": [
      {
        "scope": "string",
        "display_name": "string"
      }
    ]
  },
  "rs_res_id": "string",
  "created": 0,
  "expires": 0,
  "disabled": 0,
  "used_by_transaction": [
    "string"
  ],
  "ds_account_id": "string",
  "scopes_granted": [
    "string"
  ],
  "named_scopes_granted": [
    {
      "scope": "string",
      "display_name": "string"
    }
  ],
  "client": {
    "identifier": "string",
    "name": "string",
    "authorization_server": {
      "identifier": "string",
      "organization": {
        "id": "string",
        "name": "string"
      }
    },
    "icon_uri": "string",
    "policy_uri": "string",
    "tos_uri": "string",
    "last_active": "2022-12-08T18:48:15.377Z"
  }
}
Disable Permissions
The following request will disable granted permissions
Sample Request
curl -X POST \
  '{{WS_BASE_URI}}/me/permissions/disable' \
  --header 'Accept: application/json' \
  --header 'Authorization: Bearer {{WALLET_SESSION_TOKEN}}'
  --data-raw  '[
  {
    "permission_ids": [
      "string"
    ]
  }
]'
Sample Response
{
  "permission_id": "string",
  "data_source": {
    "data_source_id": "string",
    "style": {
      "style_color": "string",
      "style_font_color": "string",
      "logo_url": "string"
    },
    "name": "string",
    "organization": {
      "id": "string",
      "name": "string"
    }
  },
  "authorization_server": {
    "identifier": "string",
    "organization": {
      "id": "string",
      "name": "string"
    }
  },
  "resource": {
    "res_def_id": "string",
    "name": "string",
    "authorization_server_id": "string",
    "type": "string",
    "description": "string",
    "information_uri": "string",
    "scopes": [
      "string"
    ],
    "named_scopes": [
      {
        "scope": "string",
        "display_name": "string"
      }
    ]
  },
  "rs_res_id": "string",
  "created": 0,
  "expires": 0,
  "disabled": 0,
  "used_by_transaction": [
    "string"
  ],
  "ds_account_id": "string",
  "scopes_granted": [
    "string"
  ],
  "named_scopes_granted": [
    {
      "scope": "string",
      "display_name": "string"
    }
  ],
  "client": {
    "identifier": "string",
    "name": "string",
    "authorization_server": {
      "identifier": "string",
      "organization": {
        "id": "string",
        "name": "string"
      }
    },
    "icon_uri": "string",
    "policy_uri": "string",
    "tos_uri": "string",
    "last_active": "2022-12-08T18:48:15.377Z"
  }
}
Disable a Specific Permission
The following request will disable a specific permission using the permission ID
Sample Request
curl -X POST \
  '{{WS_BASE_URI}}/me/permissions/{permission_id}/disable' \
  --header 'Accept: application/json' \
  --header 'Authorization: Bearer {{WALLET_SESSION_TOKEN}}'
Sample Response
{
  "permission_id": "string",
  "data_source": {
    "data_source_id": "string",
    "style": {
      "style_color": "string",
      "style_font_color": "string",
      "logo_url": "string"
    },
    "name": "string",
    "organization": {
      "id": "string",
      "name": "string"
    }
  },
  "authorization_server": {
    "identifier": "string",
    "organization": {
      "id": "string",
      "name": "string"
    }
  },
  "resource": {
    "res_def_id": "string",
    "name": "string",
    "authorization_server_id": "string",
    "type": "string",
    "description": "string",
    "information_uri": "string",
    "scopes": [
      "string"
    ],
    "named_scopes": [
      {
        "scope": "string",
        "display_name": "string"
      }
    ]
  },
  "rs_res_id": "string",
  "created": 0,
  "expires": 0,
  "disabled": 0,
  "used_by_transaction": [
    "string"
  ],
  "ds_account_id": "string",
  "scopes_granted": [
    "string"
  ],
  "named_scopes_granted": [
    {
      "scope": "string",
      "display_name": "string"
    }
  ],
  "client": {
    "identifier": "string",
    "name": "string",
    "authorization_server": {
      "identifier": "string",
      "organization": {
        "id": "string",
        "name": "string"
      }
    },
    "icon_uri": "string",
    "policy_uri": "string",
    "tos_uri": "string",
    "last_active": "2022-12-08T18:49:28.974Z"
  }
}