Account and Session Management
Federated Login - Overview
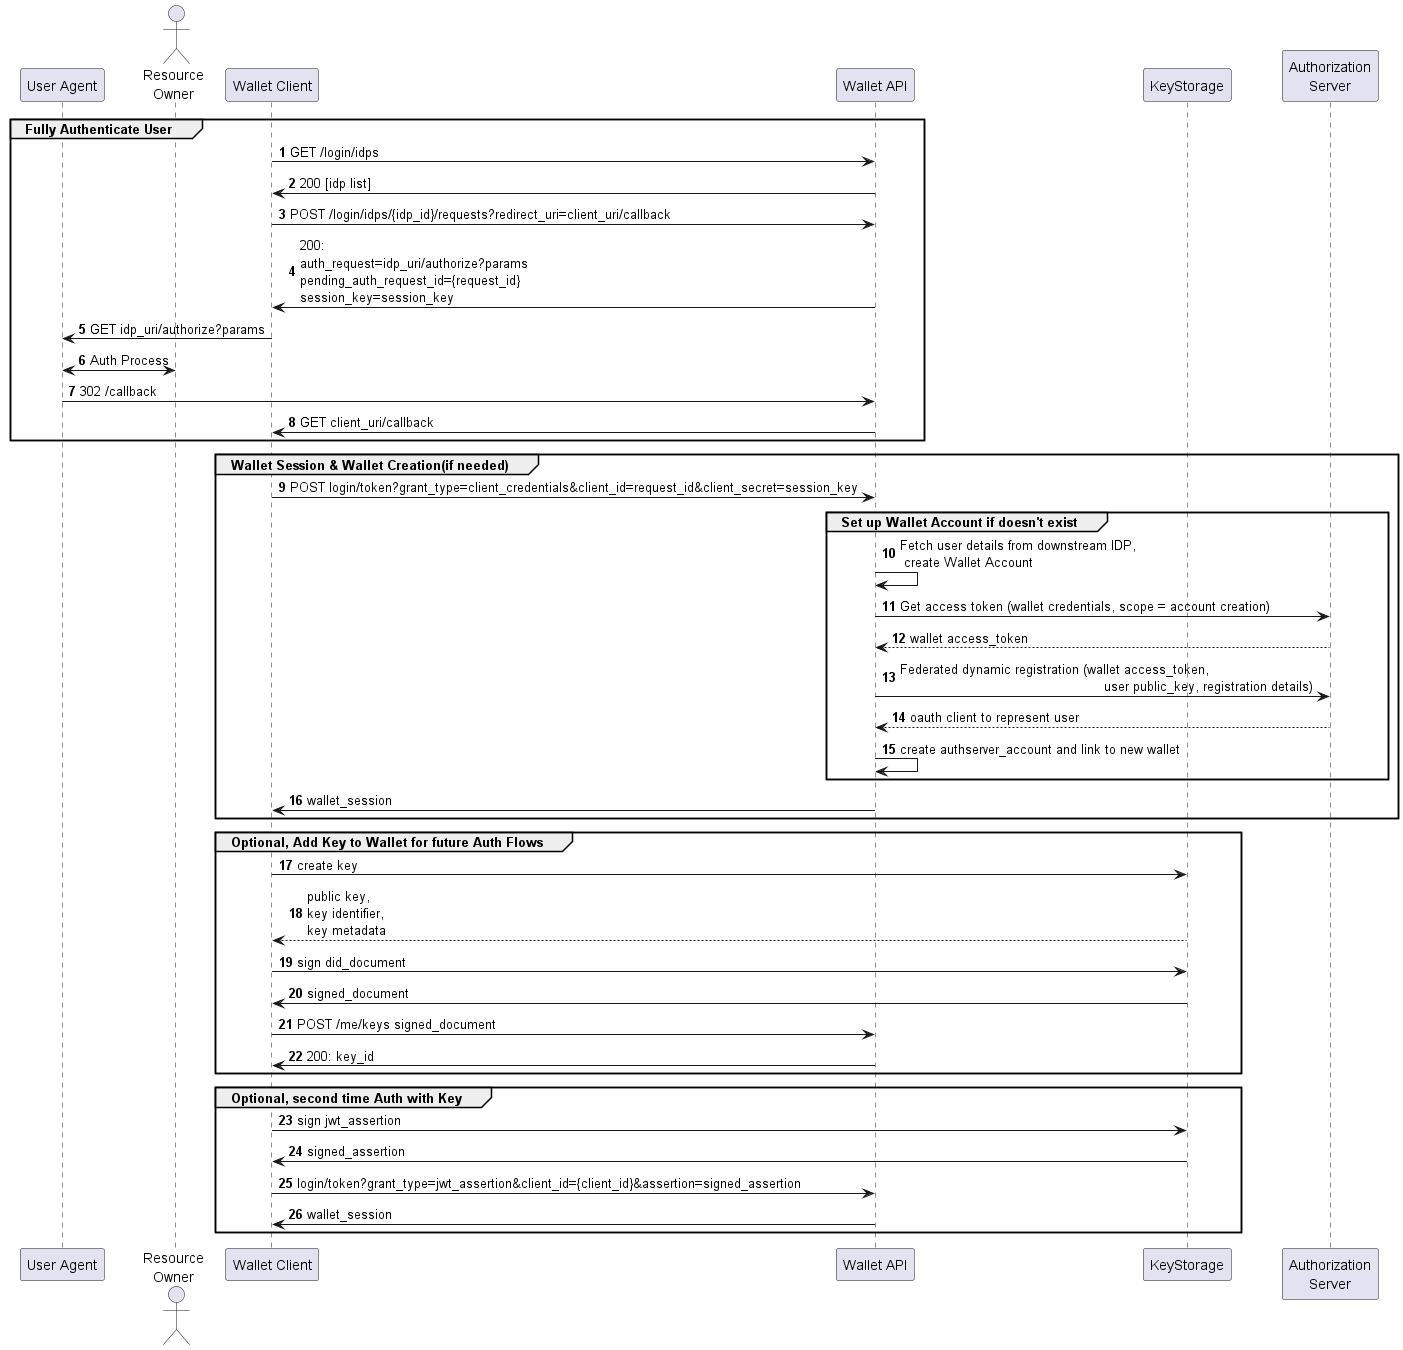
A Wallet Account enables users to access FPX Wallet's core functionality. For an independent client, a Wallet Account is created during the Federated Login Flow. The Federated Login Flow is a process for a User to log in to a Wallet Account (if an account already exists) or create a new account and get a Wallet Session. A user of IDENTOS' standard UX would have this process pre-configured. This section of the user guides details managing a Wallet Account and a Wallet Session.
Sequence Diagram:
Federated Login - Process Flow
Before creating an account, ensure that the Wallet Server is appropriately configured. Refer to the Wallet Server application configuration for details to configure the following properties:
navigator.redirects.baseUrlnavigator.redirects.idpPathnavigator.redirects.consentPathnavigator.redirects.dsPathnavigator.redirects.errorPathnavigator.useIntermediateCallbackUIidp.user.account.idpManageUrlidp.user.account.idpUserDeleteUrlidp.user.account.idpUserDeleteEnabled
Get Identity Providers
Step 1 in the sequence diagram
The first step in the Federated Login Flow is getting an idp_authenticator_id through a request to the Wallet Server's /login/idps endpoint. This will return a list of identity providers registered with the Wallet Server. The Wallet Server can make its response as HTML or as JSON, according to the accept HTTP header in the request.
The Wallet Client may opt to request a JSON response, in which case it is responsible for rendering a page to display the choice of identity providers to the user. Alternatively, it may be more convenient to request an HTML response by setting the request's accept header to text/html. In that case, the Wallet Client may simply render the HTML returned by the Wallet Server directly.
Sample Request
curl -X GET '{{WS_BASE_URI}}/login/idps' \
  --header 'Accept: application/json'
Sample Response
[
  {
    "idp_authenticator_id": "rsa-oidc-idp",
    "data_source": {
      "data_source_id": "2",
      "name": "Resource Server OIDC",
      "required": false,
      "organization": {
        "id": "1",
        "name": "IDENTOS"
      },
      "style": {
        "logo_url": "https://identos.com/wp-content/themes/identos/images/apple-touch-icon-114x114.png",
        "style_color": "#FFFFFF",
        "style_font_color": "#000000"
      }
    }
  }
]
Get IDP Authorization Endpoint
Step 3 in the sequence diagram
When the Wallet Client has determined which idp_authenticator_id to use, it must send the following request to the Wallet Server:
Sample Request
curl -X POST \
  '{{WS_BASE_URI}}/login/idps/{idp_authenticator_id}/requests' \
  --header 'Accept: application/json'
The client receives a response with an Authorize Request URL, a Session Key and Pending Authorization Request ID. The values returned for pending_auth_request_id and the session_key will be used in a later step to obtain a valid Wallet Session.
Sample Response
{
  "auth_request": "https://the-idp-url/authorize?scope=openid&response_type=code&redirect_uri=https%3A%2F%2Fwallet-url%2Flogin%2Fidps%2Fidp-authenticator-id%2Fcallback&state=y&prompt=consent&nonce=x&client_id=wallet-client-id-with-idp",
  "session_key": "string",
  "pending_auth_request_id": "string"
}
Perform IDP Authentication
Step 5 in the sequence diagram
The value of the auth_request field is the OIDC authorization endpoint URL at the chosen identity provider. The Wallet Client must redirect the user agent to this URL to authenticate with the identity provider. If authentication is successful, the identity provider will make a callback to the Wallet Server.
In turn, the Wallet Server will make a callback to the Wallet Client. The Wallet Server will make this callback to a path configured by the navigator.redirects.idpPath property of the Wallet Server application configuration. The Wallet Client must expose this endpoint in order to receive the callback.
The Wallet Server will construct the callback URL by adding the Data Source ID of the identity provider as a query parameter. The Wallet Server makes the callback as a 302 response to the user agent. The user agent will then follow the redirect to the URL provided in the response location header by making a GET request:
Sample Callback
curl -X GET '{{WALLET_CLIENT_URI}}/idp-callback?datasource=2'
Get a Wallet Session
Step 9 in the sequence diagram
After receiving the callback shown above, the Wallet Client may now make a request to obtain a Wallet Session. The values for session_key and pending_auth_request_id that were obtained previously must be included in the following request:
Sample Request
curl -X POST \
  '{{WS_BASE_URI}}/login/token' \
  --header 'Accept: */*' \
  --header 'Content-Type: application/json' \
  --data-raw '{
  "grant_type": "client_credentials",
  "client_id": "{{pending_auth_request_id}}",
  "client_secret": "{{session_key}}"
}'
Sample Response
{
  "access_token": ""{{wallet_session_token}}"
}
At this last step of the flow, a Wallet account is created and the client receives a valid Wallet Session token. This token must be included in subsequent authenticated requests to the Wallet Server, for example when connecting a Data Source.
Optional - DID Document Registration
An optional step that only mobile app users may take is registering a DID document to gain enhanced convenience in accessing the wallet. By going through this additional step, the mobile app user wouldn't have to log in with an identity provider every time their session expires. The user would be able to use methods such as biometric verification or password pins to log in.
Get Existing DID Document Keys
The following request will get existing DID document keys associated with an authenticated user
Sample Request
curl -X GET \
  '{{WS_BASE_URI}}/me/keys' \
  --header 'Accept: application/json' \
  --header 'Authorization: Bearer {{WALLET_SESSION_TOKEN}}'
Sample Response
In the response below:
idis a decentralized identifier for the DID documenttypedenotes the type of verification method that is usedcontrollerdenotes an entity that is authorized to make changes to a DID document.publicKeyBase58is a property that is used to specify the base58-encoded version of the public key
[
  {
  "id": "did:example:123#ZC2jXTO6t4R501bfCXv3RxarZyUbdP2w_psLwMuY6ec",
  "type": "Ed25519VerificationKey2018",
  "controller": "did:example:123",
  "publicKeyBase58": "H3C2AVvLMv6gmMNam3uVAjZpfkcJCwDwnZn6z3wXmqPV"
  }
]
Create New Keys
The following request will create new keys for an authenticated user
curl -X POST \
  '{{WS_BASE_URI}}/me/keys' \
  --header 'Accept: application/json' \
  --header 'Authorization: Bearer {{WALLET_SESSION_TOKEN}}'
  --data-raw '{
    "id": "string",
    "type": "string",
    "controller": "string",
    "publicKeyBase58": "string"
}'
Managing Wallet Account
Use the requests defined below to achieve the stated outcomes:
Get details of the authenticated user
Sample Request
curl -X POST \
  '{{WS_BASE_URI}}/me/profile' \
  --header 'Accept: application/json' \
  --header 'Authorization: Bearer {{WALLET_SESSION_TOKEN}}'
Sample Response
{
  "sub": "string",
  "email": "string",
  "name": "string",
  "logo_url": "string",
  "IDP_name": "string"
}
Delete a Wallet Account
An authenticated request can be made to /me/delete endpoint to delete a user's Wallet Account, and optionally, their user account at the Identity Provider as well.
To delete the user account at the Identity Provider, the idp.user.account.idpUserDeleteEnabled configuration property must be set to true, and the idp.user.account.idpUserDeleteUrl configuration property must be set to an endpoint where the Identity Provider exposes a "delete user" functionality. Additionally, the request must include a "reason" query parameter.
Note that it is still possible to delete the user's account at the Wallet even when idp.user.account.idpUserDeleteEnabled is false.
Sample Request
curl -X DELETE \
  '{{WS_BASE_URI}}/me/delete?reason=not-interested' \
  --header 'Accept: */*' \
  --header 'User-Agent: agent' \
  --header 'Authorization: Bearer c1f32558-9f0e-4983-92c0-ac2eeefd6fb4'
Sample Response
The account ID of the deleted user is received in the response.
{
    "account_id": "an-account-id"
}
Managing Wallet Session
A Wallet Session is a period during which a user has access to a particular Wallet Account. A valid Wallet Session allows users to stay logged into a Wallet Account and complete any transactions.
After a set period of time, a Wallet Session will expire and the user has to log in again. However, if a user is showing activity during an active session the expiration time will be automatically extended.
Wallet Session Extension based on API Activity
The Wallet Session Extension feature makes managing a Wallet Session more convenient by providing an automatic extension of an active session.
If a Wallet Session is active (i.e., experiencing activity) and the Session reaches its expiration time, the expiration time will automatically be extended based on the configured time frame. This ensures that an active session will continue to function smoothly without requiring manual input each time.
In the application.yaml file, a user can configure:
- If the feature is enabled or not
- The duration for the session extension
- The excluded URLs that the feature won't affect (i.e. their session won't automatically renew).
Configurations
The details of the configurations to be made in the application.yaml file are provided below.
| Parameter | Description | Suggested value |
|---|---|---|
wallet.session.enable | Configure this value to enable or disable the wallet session extension functionality. The default value is False. To enable, the value must set to be True. | Boolean Value |
wallet.session.extensionLengthInSeconds | Configure this value to specify, in seconds, the amount of time a wallet session should be extended for. | Seconds (Default value is 600 seconds) |
wallet.session.exclusionUrls | Configure this value to specify the URLs that you do not want the Wallet Session Extension feature to affect. | The Request URI of the path to exclude (e.g. /me/profile) |